
So far in the Nitrox Calculator series we've created a basic SwiftUI project and defined the layout and the basic building blocks of our Nitrox Calculator:
In Part 3 we are going to do a little bit of math and wire up the calculations to the UI
Maximum Operating Depth (MOD)
The calculations for MOD are quite basic. We need:
- The fraction of oxygen in the gas mix -
fO2 - The Partial Pressure of Oxygen (ppO₂) -
ppO2 - The measurement system - Metric or Imperial
For Metric we will use the following formula:
And for Imperial:
Note that the conversion in not very precise, 10m is supposed to be 32.8083ft. However, the typical formula that scuba divers learn uses rounded-up numbers, which also adds a little bit of conservatism. Our calculator will use the standard formulas so that we can get results closer to what the users expect when doing the calculations by hand.
Calculator class
Let's create a new Swift file, MODCalculator.swift, for the calculator class. As stated earlier, we'll need few input parameters:
class MODCalculator {
    func calculateMOD(fO2: Double, ppO2: Double, unit: Unit) -> Double {
        var mod = (ppO2 / (fO2 / 100.0) - 1) * 10.0

        if unit == .imperial {
            mod *= 3.3
        }

        return round(mod)
    }
}
At the end we round the result to the nearest integer.
Updating the UI
Time to integrate the calculator. There quite a few changes highlighted below - we'll cover them one by one:
- 2: an instance of
MODCalculatoris initialized - 7: New
@Statevariable to hold the calculated MOD - 20: Displaying the MOD
- 28, 39, 46: Updating the MOD when
fO2orppO2is changed, and when the view appears - 50: The
updateMODfunction uses the calculator instance
struct MODCalculatorView: View {
    private let calculator = MODCalculator()

    @AppStorage("unit") var unit: Unit = Unit.metric
    @State var ppO2: Double = 1.4
    @State var fO2: Double = 21
    @State var mod: Double = 0

    var body: some View {
        VStack {
            Spacer()
            VStack {
                Text("Max Operating Depth")
                    .multilineTextAlignment(.center)
                    .font(.title)
                    .padding(4)
                Text("for").light()
                Text("EAN \(fO2, specifier: "%0.0f")").strong()
                Text("is").light()
                Text("\(mod, specifier: "%0.0f") \(unit == .metric ? "meters" : "feet")").strong()

                Slider(
                    value: $fO2,
                    in: 21...100,
                    step: 1)
                    .padding()
                    .onChange(of: fO2) { _ in
                    updateMOD()
                }

                Text("with ppO₂").font(.subheadline)

                Picker("ppO2", selection: $ppO2) {
                    Text("1.4").tag(1.4)
                    Text("1.5").tag(1.5)
                    Text("1.6").tag(1.6)
                }
                    .onChange(of: ppO2) { _ in
                    updateMOD()
                }
                    .pickerStyle(.segmented)
                    .padding()
            }
            Spacer()
        }.onAppear {
            updateMOD()
        }
    }

    func updateMOD() {
        self.mod = self.calculator.calculateMOD(fO2: fO2, ppO2: ppO2, unit: unit)
    }
}
Now it's all working together:
Enhancements
The app is functionally complete, but we can do better...
When the user drags the slider to the left end we can display "Air" instead of EAN21, and when the user drags to 100 we can display "Oxygen". Let's replace Line 18 with the following block:
if fO2 == 21 {
    Text("Air")
        .strong()
} else if fO2 == 100 {
    Text("Oxygen")
        .strong()
} else {
    Text("EAN \(fO2, specifier: "%0.0f")")
        .strong()
}
and add some animations:
private let animationDuration = 0.4

// ...
Slider(
    value: $fO2.animation(.easeInOut(duration: animationDuration)),
// ...

func updateMOD() {
    withAnimation(.easeInOut(duration: animationDuration)) {
        self.mod = self.calculator.calculateMOD(fO2: fO2, ppO2: ppO2, unit: unit)
    }
}
Adding animations in SwiftUI is pretty easy. Just wrap a block of code in withanimation or add animation to a binding and it will magically animate the affected UI elements.
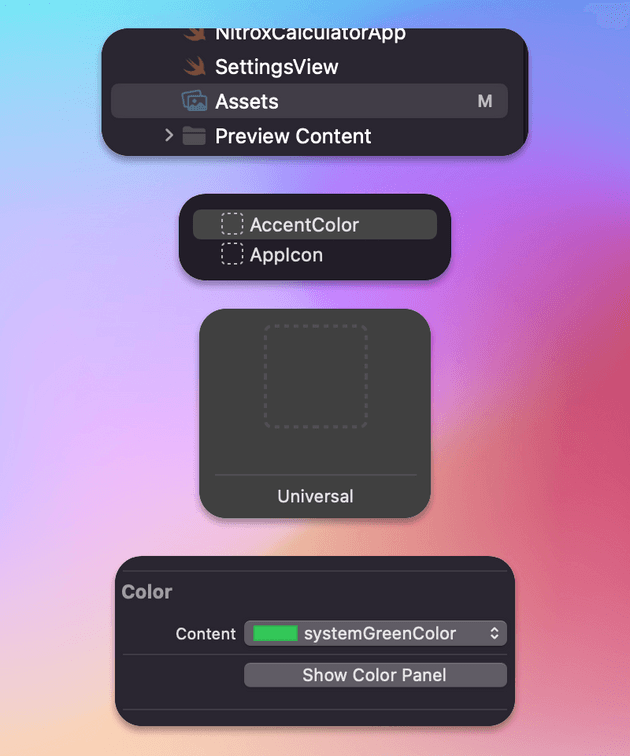
And finally, let's set the accent color. Go to Assets > AccentColor > Universal - and from the Inspector select systemGreenColor
Result
And this is the final result:
You can find the final code on GitHub